Dirt Cups
If you’re looking for a fun and nostalgic dessert that’s as easy to make as it is delightful to eat, look no further than Dirt Cups! This layered dessert is a whimsical treat that brings out the kid in all of us. With its rich chocolate flavor, creamy texture, and the surprise of gummy worms peeking out from the “dirt,” these cups are guaranteed to bring a smile to your face. Whether it’s a birthday party, a family gathering, or just a sweet indulgence at home, Dirt Cups are the perfect way to satisfy your sweet tooth.
Why This Recipe Is Reliable
This Dirt Cups recipe is incredibly reliable for several reasons. First, it requires minimal ingredients that are easy to find, making it accessible for all home cooks. Second, the use of instant chocolate pudding mix ensures that you achieve a rich and creamy filling without the need for complicated techniques or long preparation times. Additionally, the versatility of this dessert allows you to get creative with toppings and variations. Lastly, it’s a no-bake dessert, which means less hassle in the kitchen and more time to enjoy the final product!
What You’ll Need
- 3.4 ounces box instant chocolate pudding mix
- 2 cups milk
- 8 ounces whipped topping, thawed
- 10-12 Oreo cookies, crushed
- 32 gummy worms
Before You Start: Equipment
- Mixing bowl: For combining the pudding mix and milk.
- Whisk: To ensure the pudding is smooth and free of lumps.
- Spoon or spatula: For folding in the whipped topping.
- Clear cups or bowls: To create layers and showcase the “dirt” and worms.
- Measuring cups: For accurate ingredient measurements.
Dirt Cups: Step-by-Step Guide
Step 1: Prepare the Pudding
In a large mixing bowl, combine the instant chocolate pudding mix with the 2 cups of milk. Whisk together until the mixture is smooth and free of lumps. This should take about 2 minutes.
Step 2: Fold in Whipped Topping
Once the pudding is set, gently fold in the thawed whipped topping using a spatula. Be careful not to deflate the whipped topping too much; you want to keep that light and airy texture.
Step 3: Crush the Oreos
Take your Oreo cookies and place them in a zip-top bag. Crush them with a rolling pin or your hands until they reach a fine crumb consistency. This will mimic the look of dirt for your cups.
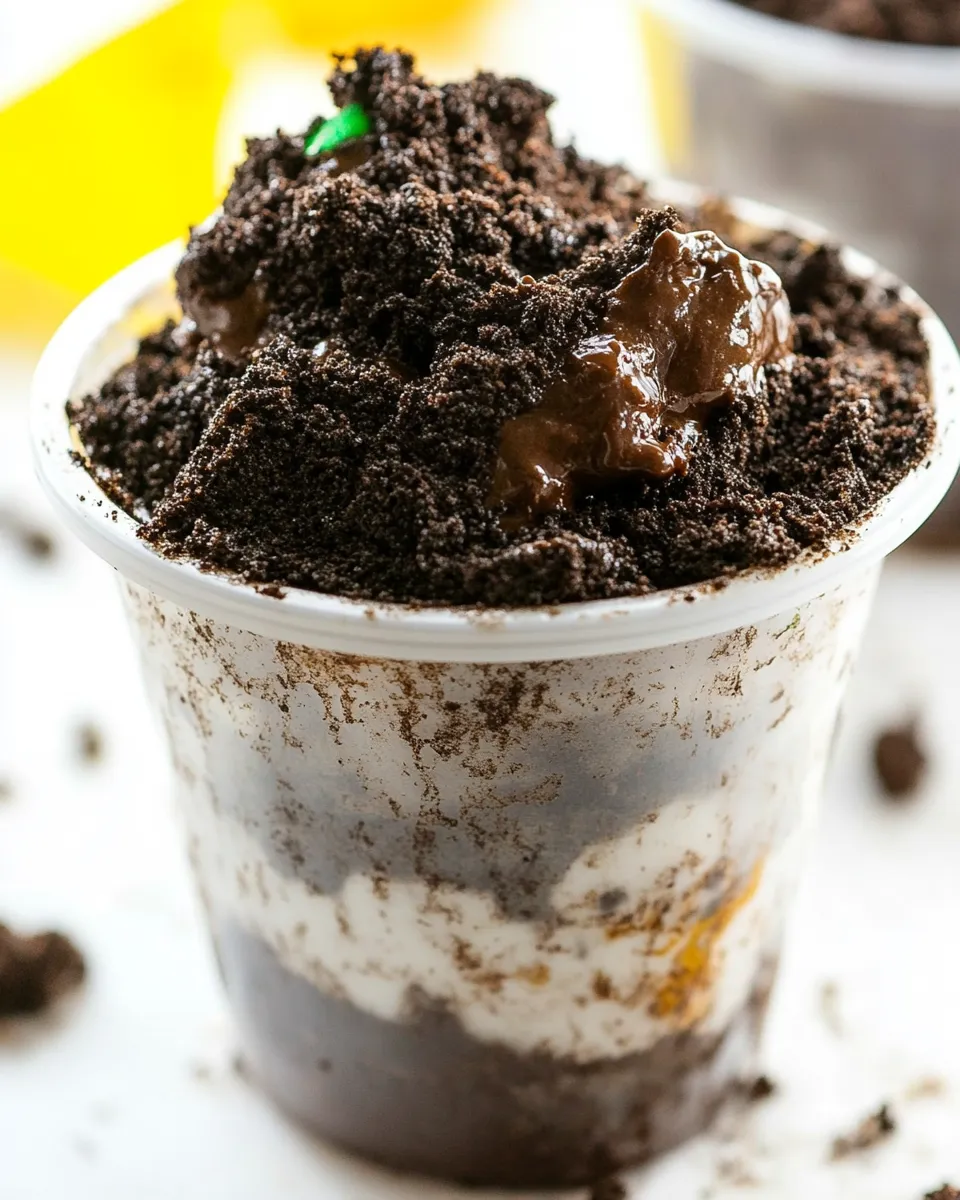
Step 4: Layer the Ingredients
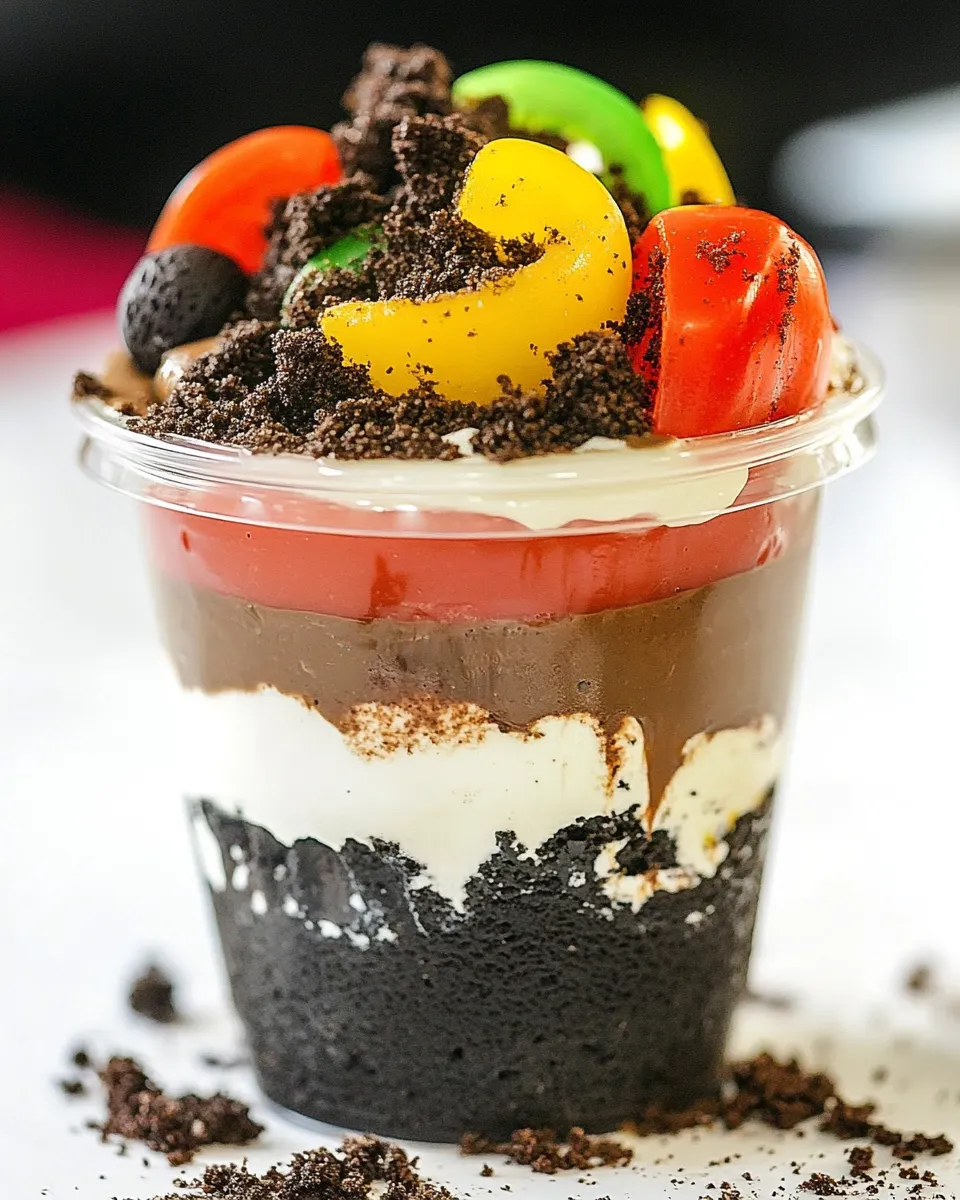
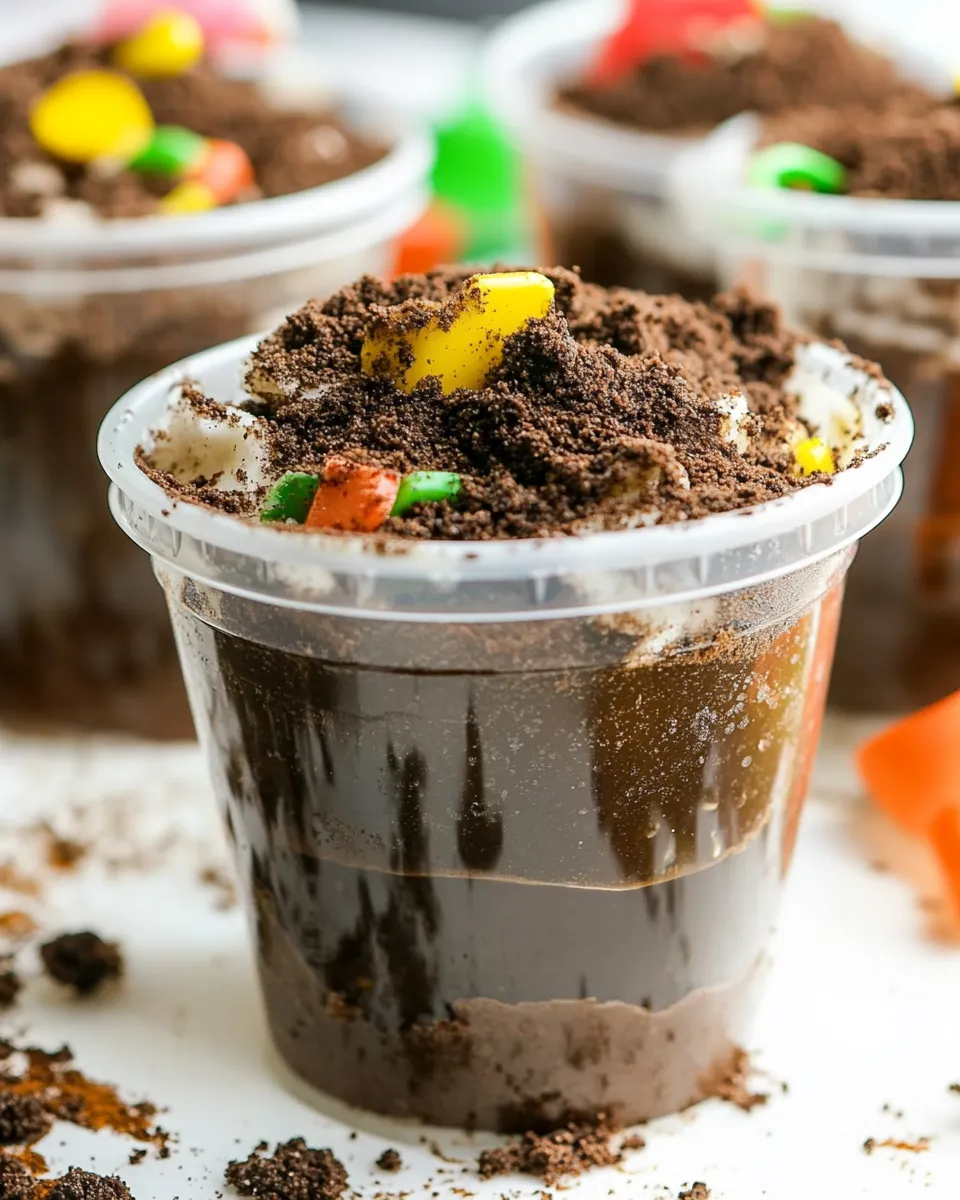
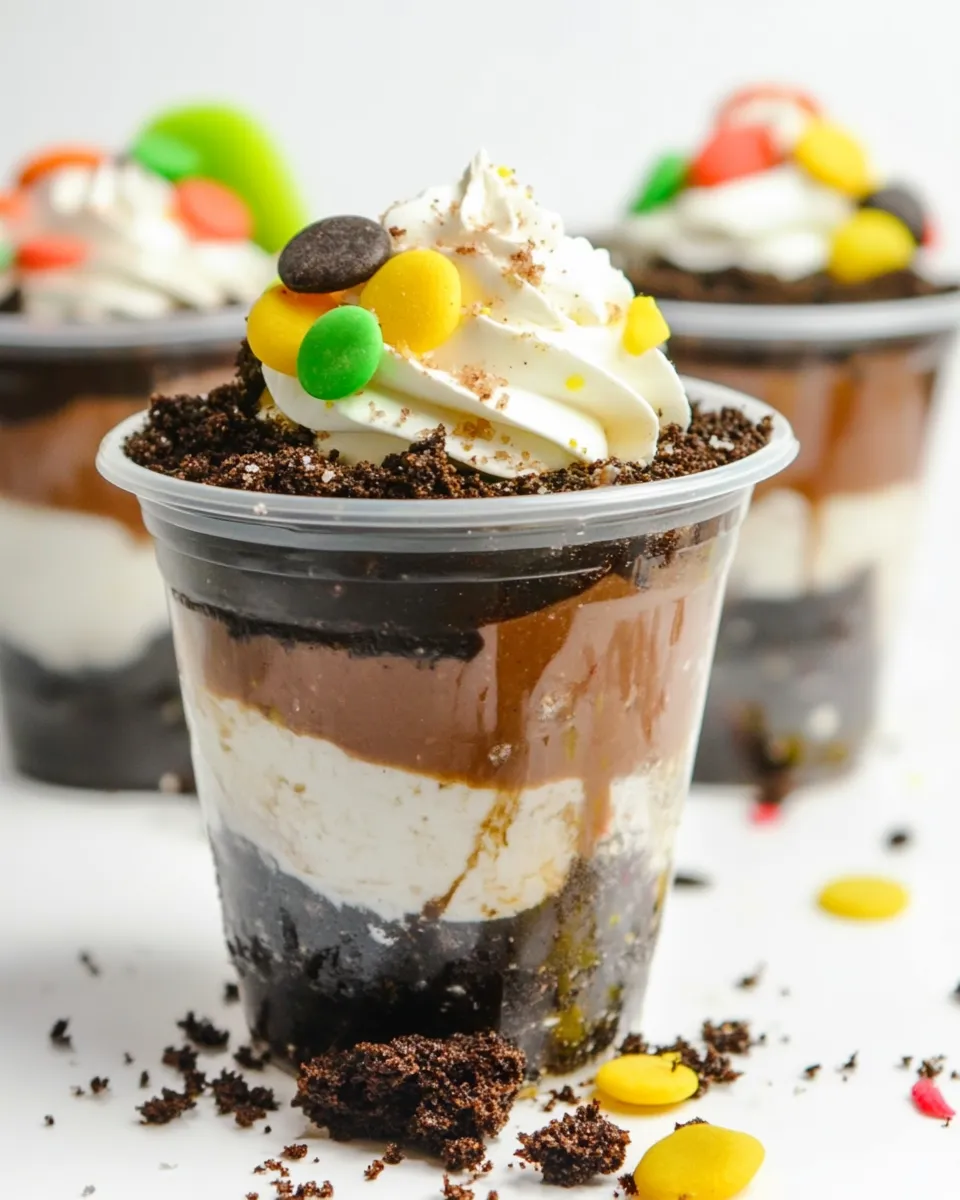
Now it’s time to assemble your Dirt Cups! Start by adding a layer of the chocolate pudding mixture at the bottom of each clear cup. Follow this with a layer of crushed Oreos, and then add another layer of pudding. Repeat the layers until you reach the top of the cup, finishing with a generous sprinkle of crushed Oreos.
Step 5: Add the Gummy Worms
To give your Dirt Cups their signature look, gently place 2-3 gummy worms on top of each cup. You can even let them hang over the edge for a fun effect!
Step 6: Chill and Serve
Cover the cups with plastic wrap and refrigerate for at least 30 minutes before serving. This allows the flavors to meld and the dessert to firm up slightly. When you’re ready to serve, grab a spoon and dig in!
Seasonal Ingredient Swaps
- Spring: Use pastel-colored gummy worms or add edible flowers for a fresh touch.
- Summer: Incorporate fresh strawberries or raspberries for a fruity twist.
- Fall: Swap the gummy worms for candy corn or pumpkin candies.
- Winter: Use crushed peppermint candies to bring in a festive flavor.
Learn from These Mistakes
To ensure your Dirt Cups turn out perfectly, here are a few common mistakes to avoid:
- Using warm milk: Make sure your milk is cold for the best pudding consistency.
- Overmixing the whipped topping: Gently fold it in to keep the mixture light and fluffy.
- Skipping the chilling step: Refrigerating the cups helps the layers set properly.
- Not crushing the Oreos finely enough: Aim for fine crumbs to achieve that realistic dirt look.
Save It for Later
If you have leftovers (which is often the case because these are so delicious), Dirt Cups can be stored in the refrigerator for up to 3 days. Just make sure to cover them with plastic wrap or a lid to keep them fresh. The pudding will continue to set, making them even more delightful the next day. However, it’s best to add the gummy worms just before serving to keep them from getting too soft.
Ask the Chef
Can I use a different flavor of pudding mix?
Absolutely! While chocolate pudding is a classic choice, you can use vanilla, butterscotch, or any flavor you prefer to create your own twist on Dirt Cups.
What can I use instead of whipped topping?
If you prefer, you can substitute the whipped topping with homemade whipped cream or a dairy-free alternative like coconut whipped cream for a lighter option.
How can I make these Dirt Cups healthier?
For a healthier version, consider using sugar-free pudding mix and low-fat milk. You can also replace Oreos with crushed nuts or granola for a different texture and added nutrients.
Can I make these in advance?
Yes, you can prepare the pudding and layer the cups a day in advance. Just be sure to keep them refrigerated until you’re ready to serve, adding gummy worms right before serving for the best presentation.
Keep Cooking
- Sally’s Baking Addiction – For more delightful dessert recipes.
- Pinch of Yum – For delicious and hearty meal ideas.
- Minimalist Baker – For simple and wholesome recipes.
Hungry for More?
If you enjoyed making these Dirt Cups, you might want to explore other fun, themed desserts. From cake pops to cupcake masterpieces, the world of sweet treats is endless! Embrace your inner baker and get creative in the kitchen with more engaging recipes that will have your friends and family begging for seconds.
In conclusion, Dirt Cups are not just a dessert; they are an experience filled with fun, creativity, and deliciousness. Whether you’re making them for a special occasion or simply to bring a little joy to your day, this recipe is sure to please. So gather your ingredients, invite your friends or family to join in, and dive into the deliciousness of these delightful Dirt Cups!
Dirt Cups
Ingredients
Equipment
Method
- In a large mixing bowl, combine the instant chocolate pudding mix with the 2 cups of milk. Whisk together until the mixture is smooth and free of lumps. This should take about 2 minutes.
- Once the pudding is set, gently fold in the thawed whipped topping using a spatula. Be careful not to deflate the whipped topping too much; you want to keep that light and airy texture.
- Take your Oreo cookies and place them in a zip-top bag. Crush them with a rolling pin or your hands until they reach a fine crumb consistency. This will mimic the look of dirt for your cups.
- Now it’s time to assemble your Dirt Cups! Start by adding a layer of the chocolate pudding mixture at the bottom of each clear cup. Follow this with a layer of crushed Oreos, and then add another layer of pudding. Repeat the layers until you reach the top of the cup, finishing with a generous sprinkle of crushed Oreos.
- To give your Dirt Cups their signature look, gently place 2-3 gummy worms on top of each cup. You can even let them hang over the edge for a fun effect!
- Cover the cups with plastic wrap and refrigerate for at least 30 minutes before serving. This allows the flavors to meld and the dessert to firm up slightly. When you’re ready to serve, grab a spoon and dig in!
Notes
- Use cold milk for the best pudding consistency.
- Gently fold in the whipped topping to keep it light and fluffy.
- Refrigerate the cups for at least 30 minutes for the best texture.